This weekend I have been busy ditching the keyboard and picking up the tools to make some more progress on my own little home improvement project.
Last week it was taking off the plaster on my back wall. That was incredibly hard work. Dusty, sweaty, all that good stuff. You can read about that in the first part of this series, which I published last week, by clicking here.
This time round, I was hoping for something a bit easier. The task on Sunday was to take down my old shack of a conservatory as well as the decking that surrounded it. My builder is starting in a weeks time so I had to get it all done in one day as I knew I wouldn’t have time during the week or next weekend to get it done.
Old conservatory mostly straight forward
Job number was taking the old conservatory down. On the face of it it looked like a fairly simple job. Pop the gutters off. Snap the top caps off. Push the old poly sheets up and out and then we could start taking the spars down.
That all happened in swift time. I’m a short arse so I got my soon to be farther in law in to help me. Within an hour the roof was down and the ring beam was being loosened up.
Then it came to de-glazing the frames. They were externally glazed PVCu frames, yet I had a fairly shoddy aluminium slider as a door. Not sure why. But I saw a sign for Wickes on one of the gutters so I’m assuming the thing came from there many moons ago.
Because it was externally glazed it had been fitted with security tape. I can confirm that whilst a pain in the backside to take off, done in the right way, it would not stop a burglar getting in. I’ll always maintain that when it comes to PVCu, internally glazed is always the way to go.
We broke the first unit. Or should I say, the help did ;-) it was a simple error. Corner of a toughened unit met a bit of concrete. Then pop! But that was the only one we broke during the take down, and to say I have never taken one down before, it’s probably a fair effort.
De-glazing finished then we could start take the frames apart. Although most of the structure was thrown up as opposed to crafted, whoever put it up did use some pretty good couplers. They didn’t want to come off! Even the neighbour popped over to lend a hand. Eventually they gave way and down came the frames.
Lastly was the cill. Pretty much the easiest part of the lot. Up it came, and now the whole thing is sitting in a neat pile ready to be taken back to our yard for stripping and recycling.
Totally rotten decking
That was part one. Part two was the decking. Given how flimsy it was in places, I assumed that it wouldn’t take long to take most of the planks up. I initially looked for the fixings to try and remove it with some dignity. Then I saw that all the screw heads were rusted.
Hammer and crowbar it was then. Turns out it was far easier that way. The decking had been down for a while, way before we moved in, and like most things outside, had not been done all that well. Before long, most of the planks were up. Pretty much all of them came up in one helpful piece, making my job a bit easier.
Once all the planks were up, it was the joists next. Some were soaking wet and rotten and I could just put my hammer through them. The ends were stuck in to some fairly primitive foundation work. They took a bit more elbow grease. But after about four hours total work on the decking, it was all up. It’s now stacked to one side in my garden ready for a mate of mine to pick it up for use in his burners back on his plot of land.
All in all, with help taking the conservatory down and a break for lunch, it took me eight hours. I know proper fitters would have had that down in probably half the time. But considering I’m not the most hands on person, and certainly no expert when it comes to anything like this, I don’t think that’s a bad shift.
Before and after
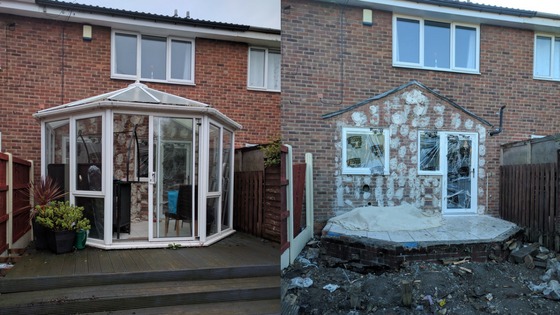
So here’s what my back garden looks like now, compared to the start of Sunday:

A big change. And one I was finally happy to make. We’ve been in the house nearly three years and it has bugged me since then. I was very happy to get to take it down.
Now it is down and ready for our builder to start prepping for the Indian stone patio, I have scaled back the size just a bit. I can see now how big my original patio was going to be, at four metres deep, it was perhaps a bit too long. I have to remember that the glass units from Prefix Systems for their Verandah product are going to be nearly that long. Do I really want or need it to be that deep?
I stuck a tape measure on it and have decided that the platform of the patio will now be three metres deep, with two steps down taking it to 3.5m. Add to that we’re squaring it off which will give us even more platform space, that should be plenty of room to entertain. We’ll also get a bit more space to extend the lawn area in the middle of our garden once the building work is done.
So my next job is to pull my finger out and get the Verandah ordered. Now it’s down I have a better idea of what size it needs to be and where the posts are going to go. That will be sorted this week and the order placed. Hopefully!
Let me know what you think. Is there something I’ve missed? What would you do if you had a blank canvass to start over again? Please leave a comment in the section below.
To get weekly updates from DGB sent to your inbox, enter your email address in the space below to subscribe:


